How to ...
Click on "For plugin writers" to see Java code that does the exact same thing.
- How to Install TrakEM2.
- What to do if TrakEM2 doesn't work for you.
- How to create a new project.
- How to import a stack
- How to register slices in a stack.
- How to add an image
- How to snap an image onto another one.
- How to stitch several images together.
- How to register simultaneously multiple images in multiple layers.
- Feature extraction: the effect of modifying the SIFT parameter "maximum image size"
- SIFT parameters explained.
- Minitutorial: create new project, add 3 images, register them, save the project and close it.
- How to install and run from TrakEM2 source code with Fiji
- How to update TrakEM2 within a Fiji repository
Click on "For plugin writers" to see Java code that does the exact same thing.
See also TrakEM2 Scripting wiki page, and the video tutorials
How to install TrakEM2
Just download Fiji.
If you are a software developer follow these instructions on how to download and build Fiji from source including TrakEM2. See also these general instructions on how to develop software with or for Fiji.
What to do if TrakEM2 doesn't work for you.
Step 1: setup your system to be able to see the error messages.
For Windows XP only: be sure to run ImageJ with java.exe and NOT javaw.exe, as explained in the Windows installation how to above.
For MacOSX only: open the /Applications/Utilities/Console.app, there is where all error messages are to be found.
For Linux and *nix only: launch ImageJ from an open terminal and not from a system menu, so that the associated terminal will remain open even in the event of an ImageJ crash. Otherwise you'll never see the error messages.
Step 2: gather as much information as possible on your system.
The easiest is to open ImageJ and then open the menu Plugins - ImageJ - Utilities - ImageJ Properties. This will open a text file; please save it and send it along.
Step 3: email all the error messages and your system information to Albert Cardona at acardona at ini phys ethz ch.
How to create a new project
Step 0: Install ImageJ with TrakEM2, and launch ImageJ.
Step 1: Select from the menus Plugins / TrakEM2 / New Project (blank).
NOTE: in Fiji, go to File / New / TrakEM2 Project (blank).
Step 2: You'll be prompted for a storage folder. TrakEM2 will store its own files in this folder.
I strongly recommend that the selected storage folder also contains the images you are going to use, and that you save the TrakEM2 project within this folder as well. These practices ensure encapsulation: file paths will be relative, and thus the folder may be moved to other locations or computers without incurring in "file not found" situations (think of Powerpoint or Indesign or Inkscape not finding image files or videos because those have been moved to different folders.) You can fix those "file not found" situations by editing the file paths directly in the project .xml file.
// a new, empty project
Project p = Project.newFSProject("blank", null, "/path/to/storage_folder/");
// or a project from an existing DTD or XML file as template
Project p = Project.newFSProject(null, DTDParser.extractTemplate("/path/to/a_template.dtd")[0], "/path/to/storage_folder/");
How to import a stack
Step 0: Create a new TrakEM2 project.
Step 1: Drag and drop any image file that ImageJ can read into an open TrakEM2 display.
Extra layers will be created automatically for you.
Project p = ControlWindow.getActive(); // or: p = Display.getFront().getProject();
                                       // or new: p = Project.newFSProject("blank");
String filepath = "/path/to/image.tif";
ImagePlus imp = new Opener().openImage(filepath);
p.getLoader().importStack(first_layer, imageplus, true, filepath);
How to register slices in a stack
Step 1: Import the stack into TrakEM2.
Step 2: if the stack is not selected, select it by clicking on its panel ("Patches" tab, scroll to find it and then click on it - the panel turns blue).
Step 2: Select the Align tool (the double planes tool; put mouse over tools to read their name in ImageJ status bar).
Step 3: right-click on the stack and select "Align stack slices".
While the alignment executes, you can use the hand tool and the glass tool to navigate it. all other input is blocked until the task finishes.
// if the Patch object wrapping the stack is selected, then:
Patch patch = (Patch)Display.getFront().getActive();
Thread task = AlignTask.registerStackSlices(patch);
// wait for asynchronous task to complete
try { if (null != task) task.join(); } catch (Exception e) { e.printStackTrace(); }
How to add an image
Step 0: Create a new TrakEM2 project.
Step 1: Drag and drop an image from a directory into the canvas.
Alternatively, right-click on the canvas and select "Import / Import image..."
Layer layer = Display.getFront().getLayer();
// or:
// LayerSet ls = ControlWindow.getActive().getRootLayerSet();
// double z_coord = 25.5;
// double thickness = 20.0;
// Layer layer = ls.getLayer(z_coord, thickness, true); // will create one new if not there

String filepath = "/path/to/image.png";
ImagePlus imp = new Opener().openImage(filepath);
double x = 300;
double y = 500;
Patch patch = new Patch(layer.getProject(), x, y, imp);
patch.getProject().getLoader().addedPatchFrom(filepath, patch);
layer.add(patch);
// optional: enlarge/shrink the canvas dimensions to fit the new image
layer.getParent().setMinimumDimensions();
How to snap an image onto another one.
Step 1: select an image by clicking on it with the Select tool (black arrow).
Step 2: drag the image until it overlays any other number of images.
Step 3: right-click on the image and select "Snap". The image will be snapped onto the best matching image from those that it overlaps with.
Display display = Display.getFront();
// get a layer from which to grab patches (class Patch wraps an image)
Layer layer = display.getLayer();
// or:
// LayerSet ls = ControlWindow.getActive().getRootLayerSet();
// Layer layer = ls.getLayer(23.4); // by z coord
// Layer layer = ls.getLayer(10); // by index: the 10th layer
// Layer layer = ls.getLayer(122345); // by id (a long)

// There are several ways to get patches:
Patch image1 = layer.get(1234); // by id
Patch image2 = (Patch)layer.getDisplayables(Patch.class).get(0); // by z-index within the layer
// or create it new (see howto above)

// snap image1 onto the image with which it overlaps the most:
Thread task = AlignTask.snap(image1, AlignTask.p_snap, list);
try { if (null != task) task.join(); } catch (Exception e) { e.printStackTrace(); }

// optional: enlarge/shrink the canvas dimensions to fit the new image
layer.getParent().setMinimumDimensions();
How to stitch several images together.
Step 1: select several images by shift-clicking them with the Select tool (black arrow)
Step 2: right-click and choose "Montage". A best attempt will be made to match them all to all and figure out the best solution.
Here is an example of the process and result of stitching several images together. The underlying algorithm is the Scale Invariant Feature Transform (Lowe 2004) as implemented by Stephan Saalfeld.
Display display = Display.getFront();
// get a layer from which to grab patches (class Patch wraps an image)
Layer layer = display.getLayer();

// grab all patches from the layer
ArrayList<Patch> all = (ArrayList<Patch>) layer.getDisplayables(Patch.class);

// the "nail" image won't move
Patch nail = all.get(0);
ArrayList<Patch> nailed = new ArrayList<Patch>();
nailed.add(nail);

// start registration
Thread task = AlignTask.alignPatchesTask( all, nailed );
try { if (null != task) task.join(); } catch (Exception e) { e.printStackTrace(); }

// optional: resize display to fit all images in it
layer.getParent().setMinimumDimensions();
How to register simultaneously multiple images in multiple layers.
Step 1: import any number of images, many per layer or just one, onto many layers.
Step 2: with the "Align Tool", right-click on the display and select "Align multi-layer mosaic".
Layer layer = Display.getFront().getLayer();

// With a dialog:
Thread t = AlignTask.alignMultiLayerMosaicTask(layer);
t.join();

// Without a dialog:
LayerSet layer_set = Display.getFront().getLayerSet();
List<Layer> some_layers = layer_set.getLayers().subList(3, 6); // includes layers 3,4,5
Align.Param cp = Align.param.clone(); // for connecting tile pairs
Align.ParamOptimize p = Align.paramOptimize.clone(); // for extracting features
Align.ParamOptimize pcp = p.clone(); // for optimizing across layers
pcp.desiredModelIndex = 1; // 0=translation, 1=rigid, 2=similarity, 3=affine

boolean tilesAreInPlace = false; // if tiles are already overlapping with the proper ones within a layer, from a manual registration for example.
boolean largestGraphOnly = false; // consider only the largest graph of connected tiles
boolean hideDisconnectedTiles = false; // call setVisible(false) on Patch instances that do not belong to the largest graph
boolean deleteDisconnectedTiles = false; // remove Patch instances that do not belong to the largest graph
AlignTask.alignMultiLayerMosaicTask(some_layers, cp, p, pcp, tilesAreInPlace, largestGraphOnly, hideDisconnectedTiles, deleteDisconnectedTiles);
Feature extraction: the effect of modifying the SIFT parameter "maximum image size"
We are aligning TEM tiles acquired by Leginon. Both images overlap around 10 % in width. Despite the electron beam elastically deforming the ultrathin section at each image acquisition due to heat, we expect very little differences within the overlapping region.
On the left, max_size = 256. Note how only large features are found. The finer details of the image have been merged away when starting the image pyramid at 1/8th of the original image tile size of 2048x2048 pixels. This is the equivalent of looking at an object from very far: only broad features are visible.
On the right, max_size = 1024. Now both large and small features are found. We could find even more smaller features by starting at the original size, 2048.
Both images show only the inlier features: those identified by RANSAC as belonging to the best possible transformation model. All other identified features are not depicted, for clarity.
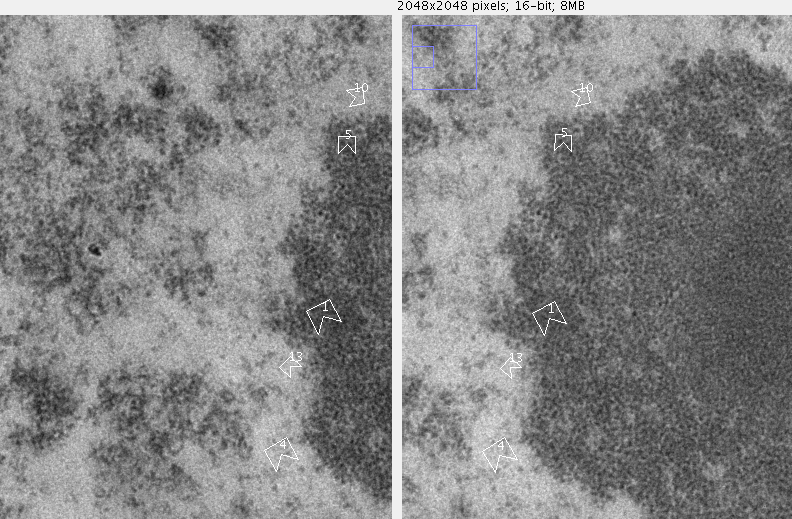

Images were generated with the Sift_Matching.java plugin, which requires TrakEM2 to be installed.
The resulting affine transforms that describe the registration:
max_size = 256

 0.99999764769672,   0.002169009227177, 1840.5052774712833
-0.002169009227177, 0.99999764769672,     33.38239346132822
max_size = 1024

0.999979670244666, -0.006376448648657, 1846.9495819316148
0.006376448648657,  0.999979670244666,   38.051533861723584
Notice how there are small, noticeable differences in the translation (right columns): when scaling down, some information is lost.
For intra-slice registration, that is, to register neighboring tiles which show part of the exact same object (even if slightly deformed), one can go up with the max_size as much as desired. The only potential problem is much longer processing time.
For inter-slice registration, that is, to register images corresponding to consecutive sections of the same object, it is far more desirable to use a low max_size value. The reason: we want to find only large features, which correspond to objects large enough that their profile does not change significantly across the slice thickness. Any features smaller than the slice thickness may be totally bogus, and potentially lead to the creation of an incorrect transformation model.
SIFT parameters explained
- Steps per scale octave: Keypoint candidates are extracted at all scales between maximum image size and minimum image size. This Scale Space is represented in octaves each covering a fixed number of discrete scale steps from σ0 to 2σ0. An octave is a level of a pyramid over scale with each level having half the size of the previous one. More steps result in more but eventually less stable keypoint candidates. Tip: Keep 3 as suggested by Lowe (2004) and do not use more than 10.
- Initial Gaussian blur: Accurate localization of keypoints requires initial smoothing of the image. If your images are blurred already, you might lower this value slightly to get more but eventually less stable keypoints. Increasing this value increases the computational cost for Gaussian blur, setting it to 3.2 is equivalent to keep 1.6 and use half maximum image size. Tip: Keep the default value 1.6 as suggested by Lowe (2004).
- Feature descriptor size: Keypoint candidates (read: a landmark or point for the registration) are matched using a local descriptor (this descriptor is the heart of the Scale Invariant Feature Transform). The descriptor consists of n×n gradient histograms, each from a 4×4px block. n is this value. Lowe (2004) uses n=4. We found larger descriptors with n=8 perform better for electron microscopical images.
- Feature descriptor orientation bins: The number of orientation bins per 4×4px block as described above. Tip: Keep the default value 8 as suggested by Lowe (2004)
- Minimum image size: The Scale Space stops if the size of the octave would be smaller than minimum image size. Tip: Increase the minimum size to discard large features (i.e. those extracted from looking at an image from far, such as the overall shape).
- Maximum image size: The Scale Space starts with the first octave equal or smaller than the maximum image size. Tip: By reducing the size, fine scaled features will be discarded, favoring larger features. Larger features are more likely to remain constant across serial sections. Increasing the size beyond that of the actual images has no effect.
- Minimal alignment error: RANSAC was starting with this, but thanks to a better outlier filter this will be removed soon. Tip: 1 or 2 is good.
- Maximal alignment error: Matching local descriptors gives many false positives. True positives are consent with a common transformation (that what we are looking for) while false positives are not. This consent set and the transformation are identified using RANSAC. This value is the maximal allowed transfer error of a match to be counted as a good one. Tip: Set this to about 10% of the image size.
- cs min epsilon: the minimal alignment error for use in cross-section registration.
- cs max epsilon: id. the maximal.
- Minimal inlier ratio: The ratio of the number of true matches to the number of all matches including both true and false used by RANSAC. 0.05 means that minimally 5% of all matches are expected to be good while 0.9 requires that 90% of the matches were good. Only transformations with this minimal ratio of true consent matches are accepted. Tip: Do not go below 0.05 (and only if 5% is more than about 7 matches) except with a very small maximal alignment error to avoid wrong solutions.
- Registration type: whether to compute only translations, or both translations and rotations.
- Tiles are prealigned: whether tiles in a montage have been manually montaged to some extent, and thus the automatic registration should not search for matches in all to all tiles, but only in those tiles that already overlap a given tile. Does wonders to performance because the matching complexity is linear instead of quadratic in terms of the number of tiles.
Minitutorial: create new project, add 3 images, register them to make a montage, save the project, make a snapshot of the montage and close the project.
Step 0: Install ImageJ with TrakEM2, and launch ImageJ. Or do it from Fiji.
Step 1: Go to Plugins - TrakEM2 - New Project (blank) (or to File - New - TrakEM2 Project (blank) in Fiji).
Step 2: Select a storage folder when prompted.
Step 3: Drag and drop three images from a system folder into the opened TrakEM2 display.
ImageJ status bar will report on import progress. Scaled down versions of the images are generated and stored in a new trakem2.mipmaps/ folder in your selected storage folder.
If you drag and drop a folder of images instead, you will be prompted for options on how to automatically position all the images -- but this is beyond the scope of this minitutorial. See the manual at "Importing a sequence of images as a grid or montage". You can also import from a text file that specifies file paths, X, Y, and Z coordinates.
Step 4: In ImageJ toolbar, choose the Select Tool (black arrow).
Step 5: Click on an image inside the display and drag it away to reveal the other image underneath; do the same again to reveal the third image.
Step 6: For a faster montage, drag each image onto another so that they all grossly overlap as you know they should.
Then click on an image with the Select Tool, then shift+click on another, and finally shift+click on the third, so that all three are selected. Notice how the first two are framed in pink and the last in white. The last selected image is the active image, and will not be moved from position. The other two will be registered pivoting around the active image.
Additional commands and capabilities:
Deselect images by shift+click on it to make it active, then again shift+click to deselect.
Push ESC key to deselect all.
Select any number of images by choosing a ROI tool such as Rectangular Selections tool, and then right-click and choose Selection - Select all under ROI.
You can also lock any image or images by selecting it, then right-click and choose Lock (or Unlock). Locked images won't be affected by the montaging.
Step 7: Right-click and select Montage. If your images are big, choose a maximum image size of 512 and a scale proportional to that (for example, for 2048x2048 images, use scale 25%.)
Push OK and wait -- observe ImageJ status bar for progress reporting (and also the terminal output, or Console.app in a MacOSX.)
For a faster montage, be sure to check the box that says "Tiles are roughly registered" so that registration will be performed on overlapping tiles only (as opposed to all to all.)
If unhappy with the results, push shift+z to undo the transformations, and repeat steps 6 and 7 increasing the maximum image size parameter (and the scale parameter accordingly.) The largest maximum image size that makes sense is the largest length of a side of an image (i.e. 2048 for a 2048x2048 image), and scale 100%.
Step 8: To correct uneven brightness and contrast, right-click and explore the Adjust submenu. You can set a min and max for all selected images, automatically enhance each independently or all in a coordinated fashion.
There is no undo, but the original images are not modified in any way -- only the scaled mipmaps.
Step 9: Right-click and choose Project - Save, or push 's' while having the display window in focus. You can do this as many times as you please.
Step 10: Take a snapshot of the registered montage. Select the Rectangular Selection tool from ImageJ toolbar, draw a rectangular ROI and then right-click and choose Display - Make flat image.
Enter a scale value (1.0 equals 100%; use 0.25 for 25%, etc.), and 8-bit or RGB snapshot.
A new image will open within ImageJ, which you can save with standard File - Save menu.
Step 11: Once saved, go to the TrakEM2 window (with the three colored panels) and close it. Done!
// Birth, life and death of a TrakEM2 project
// ------------------------------------------
// Create a project, add images to its default layer,
// register and adjust the images,
// export a snapshot of the result,
// and save and close the project.


// 0 - Disable GUI if headless desired
ControlWindow.setGUIEnabled(false);

// 1 - Create a new, empty project
Project project = Project.newFSProject("blank", null, "/path/to/storage_folder/");
// or a project from an existing DTD or XML file as template
// Project project = Project.newFSProject(null, DTDParser.extractTemplate("/path/to/a_template.dtd")[0], "/path/to/storage_folder/");

// 2 - Obtain LayerSet and Layer pointers
LayerSet ls = project.getRootLayerSet();
Layer layer = ls.getLayer(0); // there is one layer by default in a new Project.

// 3 - Adding images to a Layer
final Opener opener = new Opener();
//
double x = 100; // initial coordinates
double y = 300;
ImagePlus imp1 = opener.openImage("/path/to/image1.tif");
Patch patch1 = project.getLoader().addNewImage(imp1, x, y);
layer.add(patch1);
// repeat for other 2 images
// ...

// Optionally, you can set the transform as well for each Patch:
AffineTransform at = new AffineTransform();
affine.translate(100, 300);
affine.scale(0.5, 0.5);
patch1.setAffineTransform(affine); // will copy its values,
           // not retain the AffineTransform object, so you can reuse it.

// 4 - Update displays (optional, it's been done already at layer.add)
//    You can use layer.addSilently(patch1) to avoid updating displays
//    but such method is dangerous: no proper stack index ordering
//    for different kinds of Displayable objects (such as text DLabel,
//    which should be always on top, i.e. at the end of the layer list.)
Display.update(layer);

// 5 - Register/Montage images
List<Patch> patches = new List<Patch>();
patches.add(img1);
// ... add all other images to the List
// ...

List<Patch> fixedPatches = new List<Patch>();

Thread task = AlignTask.alignPatchesTask( patches, fixedPatches );
if (null != task) {
    try { task.join(); } catch (Exception e) { e.printStackTrace(); }
}

// 6 - Adjust brightness and contrast
ArrayList<Patch> al = new ArrayList<Patch>();
al.add(patch1);
// ... add all other images
// WARNING: must all be of the same dimensions.
//          Will refuse to work otherwise.
//
// Strategy A: set same min and max for all images,
//   but shifting the histogram's peak to compensate a bit.
double min = 15600; // for 16-bit TEM images
double max = 24700;
Thread task = project.getLoader().setMinAndMax(al, min, max);
if (null != task) {
    try { task.join(); } catch (Exception e) { e.printStackTrace(); }
}
// Strategy B: order all tiles by the stdDev of their histograms, and then
// use the central 50% to obtain average values to apply to all tiles.
Thread task2 = project.getLoader().homogenizeContrast(al, null);
if (null != task2) {
    try { task2.join(); } catch (Exception e) { e.printStackTrace(); }
}

// 7 - Update displays if any:
Display.update(layer);

// 8 - Save the project
// It is recommended to store .xml inside the storage folder, so that
// then image file paths are relative and thus the whole folder
// can be moved between different computers trivially:
project.saveAs(project.getLoader().getStorageFolder() + "the_name.xml", true); // overwriting any existing xml file with that name

// 9 - Take a snapshot of the registered images
Rectangle box = layer.getMinimalBoundingBox(Patch.class); // or any other ROI you like
double scale = 1.0;
int type = ImagePlus.GRAY8; // or .COLOR_RGB
int c_alphas = 0xffffffff; // channel opacities, applies to RGB images only
boolean quality = true; // use max possible rendering quality
ArrayList list = null; // null means all. You can define a subset of Displayable objects
                       //  of that layer (such as Patch objects) to be rendered instead.
ImagePlus snapshot = project.getLoader().getFlatImage(layer, box, scale, c_alphas, type, Patch.class, list, quality);
new ij.io.FileSaver(snapshot).saveAsTiff("/path/to/image.tif");

// 10 - Close the project
project.destroy();
// If GUI was disabled, be nice and reenable it:
ControlWindow.setGUIEnabled(true);

// Done!
How to install and run from TrakEM source code with Fiji
This How To is meant for developers. To install TrakEM2 with Fiji, all ready to go, just download Fiji.
Step 1: Install Fiji with git.
Step 2: launch Fiji:
$ ./Imagej-linux64
How to update TrakEM from source code within a Fiji repository
This How To is meant for developers. To update TrakEM2 from within Fiji, just go to menu "Help - Update Fiji".
Step 1: Open a shell and go to Fiji's root directory:
$ cd fiji/
Step 2: Update TrakEM2 git repository:
$ cd TrakEM2/
$ git checkout main
$ git pull
Step 3: Compile and install TrakEM2 into the Fiji plugins folder:
$ mvn -Dscijava.app.directory=/path/to/Fiji.app -Dmaven.test.skip=true -Denforcer.skip=true -Dimglib2.version=LATEST clean installYou can inspect TrakEM2's repository state with git log and git branch. The git pull command above updates the repository to the latest. The git checkout main above serves the purpose of updating TrakEM2 to the head of the repository, up from the latest submodule commit in fiji (most likely a "(no branch)" situation.)
Step 4: launch fiji with a more appropriate heavy-duty command such as (assuming the computer has more than 32 Gb of RAM):
$ ./ImageJ-linux64 --dry-run | sed 's/-Xincgc/-XX:+UseG1GC -verbose:gc -XX:+PrintGCDateStamps'/ >> launcher.sh
$ chmod +x launcher.sh
$ ./launcher.sh
See the TrakEM2 wiki page for explanations on the above parameters.
Step 5: Within fiji (Fiji Is Just ImageJ -- batteries included), launch TrakEM2 normally by opening project .xml files, or by going to "File - New - TrakEM2 Project" menu entry.